Message For Address
Currently, I am working on a video game for my Animation MFA thesis project. This will be a visual novel type game and will tell a non-linear story of the Philadelphia DIY punk music scene in 2014 and how I experienced it as a young queer woman. I am the solo developer, artist, designer, creator, etc. It is a huge labor of love to learn everything that goes into making a game, and so far it has been an incredibly satisfying process. Below is a small video play-through in Unity of the current state of the game. Under that are a few renders of the room assets done in Maya's Renderman.
Keep scrolling to view examples of C# scripts from the game, as well as examples of C# tools, Blueprint scripts in Unreal, custom shader work, and some 3D asset creation examples.
C# Scripting for Games
The following C# code comes from a script written for my thesis project. It is a code snippet from my DetectCollisionWithCam script, which is applied to the characters in the scene and detects when the character has collided with the player (main camera). Once these characters collide, they turn to face the camera to prepare for conversation - which can be seen in the play through video. (For a full description of what was done, check out the github link below the code).
Code snippet of my OnTriggerEnter function:
// we are overriding the OnTriggerEnter  from the MonoBehaviour class
    private void OnTriggerEnter(Collider collidedObj)
    {
        // check that collidedObj is the player & camera
        if (collidedObj.gameObject.tag == "MainCamera")
        {
            // get the world space of the camera (we get this through the collidedObj param)
            UnityEngine.Vector3 camRelativePos = collidedObj.transform.eulerAngles;

            // get the world space of the gameObject (get through gameObject param)
            UnityEngine.Vector3 NPCRelativePos = gameObject.transform.eulerAngles;
            // use the findRotation helper method to find the amount of rotation we need to rotate
            // the gameObject to make them look at the camera
            // store the value of this rotation needed in NPCRotY
            float NPCRotY = 0;
            findRotation(camRelativePos.y, NPCRelativePos.y, ref NPCRotY);
            // Now that we have the rotation amount needed, we find the center point
            // of the bounding box and rotate around that point by the NPCRotY amount
            //Fetch the Collider from the GameObject
            Collider m_Collider = GetComponent<Collider>();
            //Fetch the center of the Collider volume
            UnityEngine.Vector3 m_Center = m_Collider.bounds.center;
            // rotate around that center collider box point
            gameObject.transform.RotateAround(m_Center, gameObject.transform.up, NPCRotY);
            // we can confirm whats happening in the debug log!
            UnityEngine.Debug.Log("camRelativePos = " + camRelativePos + "   NPCRelativePos = " + NPCRelativePos + "  NPCRotY = " + NPCRotY);
        }
    }
C# Tool Creation - Prefab Replace Editor Window
The following C# code creates a custom editor window for replacing any number of selected GameObjects containing a certain script component with a selected Prefab. Not only does this code replace the old GameObject with a new Prefab, it retains the position, rotation and scale of the GameObject, updates the Prefab name to match the replaced GameObject, and also updates the script component. Within this script are references to an Object and a Script in the scene, so this code updates these Object and Script references with updated Prefab Objects and Prefab's script components.  View the video below for further explanation and to see the working tool, and under that is some of the code to create the tool.
Code snippet of my ReplaceObject helper function, which is called to make the replacement of the existing gameObject with the new Prefab:
// ReplaceObject
    //      helper function called by Replace()
    //      replaces an existing GameObject specified by the user with a Prefab specified by the user
    //      the Prefab will have the same position, rotation and scale as the replaced GameObject.
    //      We also update our dictionaries to keep track of what GameObject is replaced with what Prefab
    //      and what GameObject script is replaced with what Prefab script.
    //  params:
    //      newPrefab: a GameObject representing the new prefab to be instantiated
    //      newScript: a ReplacableObjectScript representing the new script to be added as a component to the
    //                  new prefab
    //      oldScript: a ReplacableObjectScript representing the script component of the GameObject being replaced
    //  returns:
    //      none
    public void ReplaceObject(GameObject newPrefab, ReplacableObjectScript newScript, ReplacableObjectScript oldScript)
    {
        // loop through the game objects in the scriptObjList with our custom GetList function
        foreach (var oldObj in scriptObjList.GetList())
        {
            // check that the current gameObject is not null
            if (oldObj == null)
            {
                // if it is null, continue to the next object
                continue;
            }  
            // create a new GameObject out of the selected prefab and rename it    
            newPrefab = (GameObject)PrefabUtility.InstantiatePrefab(prefab);
            newPrefab.name = "Prefab_" + oldObj.name;
            // set the new prefabs position, rotation, and scale to match the existing gameObject
            newPrefab.transform.position = oldObj.transform.position;
            newPrefab.transform.rotation = oldObj.transform.rotation;
            newPrefab.transform.localScale = oldObj.transform.localScale;
            // add the oldObj and new prefab to the reference dictionary to fix object references
            objRefDict.Add(oldObj, newPrefab);
            // create a script and add it to the prefab
            newScript = newPrefab.AddComponent<ReplacableObjectScript>();
            newScript.referenceObject = null;
            newScript.referenceScript = null;
            // the reference script attached for oldObj is found with oldObj.GetComponent<ReplacableObjectScript>().referenceScript
            // we want to store oldObj script as a key with newObj script as the value
            oldScript = oldObj.GetComponent<ReplacableObjectScript>();
            if (oldScript != null)
            {
                scriptRefDict.Add(oldScript, newScript);
            }
        }

Blueprint Scripting for Games
I am currently furthering my knowledge and experience in Unreal Engine 5 by taking a udemy C++ development course on Blueprint and C++ in Unreal. Through this course I have learned enough to create my own small first person shooter game where the player has to throw beer bottles to destroy a music studio set up. Below is a video of a the level, as well as screenshots of the level Blueprint and some custom materials created in Blueprint.
Material / Shader Creation
I am capable of creating materials through nodes and custom HLSL code in Unreal, UI and custom HLSL code in Unity, and through Maya, Arnold, and Renderman UI in Maya. Below are some examples of some shaders I have made, and as you will see in my thesis game and below, I'm really partial to 'moving textures', where each object has a short image sequence that it rotates through (either by a script or by a custom shader) to create a more hand drawn feel to the hard 3D object.

The video above shows an animated shader in UE5 made up of three similar, but unique texture samples. The three textures transition rigidly one after another based on the timing of a cosine wave through a custom HLSL node which determines where in the cosine wave we are to determine which texture should be visible. You can see the shader in action on the flat plane.

The video above is a similar shader in UE5, made up of the same three texture samples. However, instead of using a custom HLSL code node to create rigid, defined transitions between textures, this shader uses a series of linear interpolation (LERP) nodes with stepped masked alphas. This creates a similar shader look, but the transitions are smoother and less defined. You can see the shader in action on the flat plane.

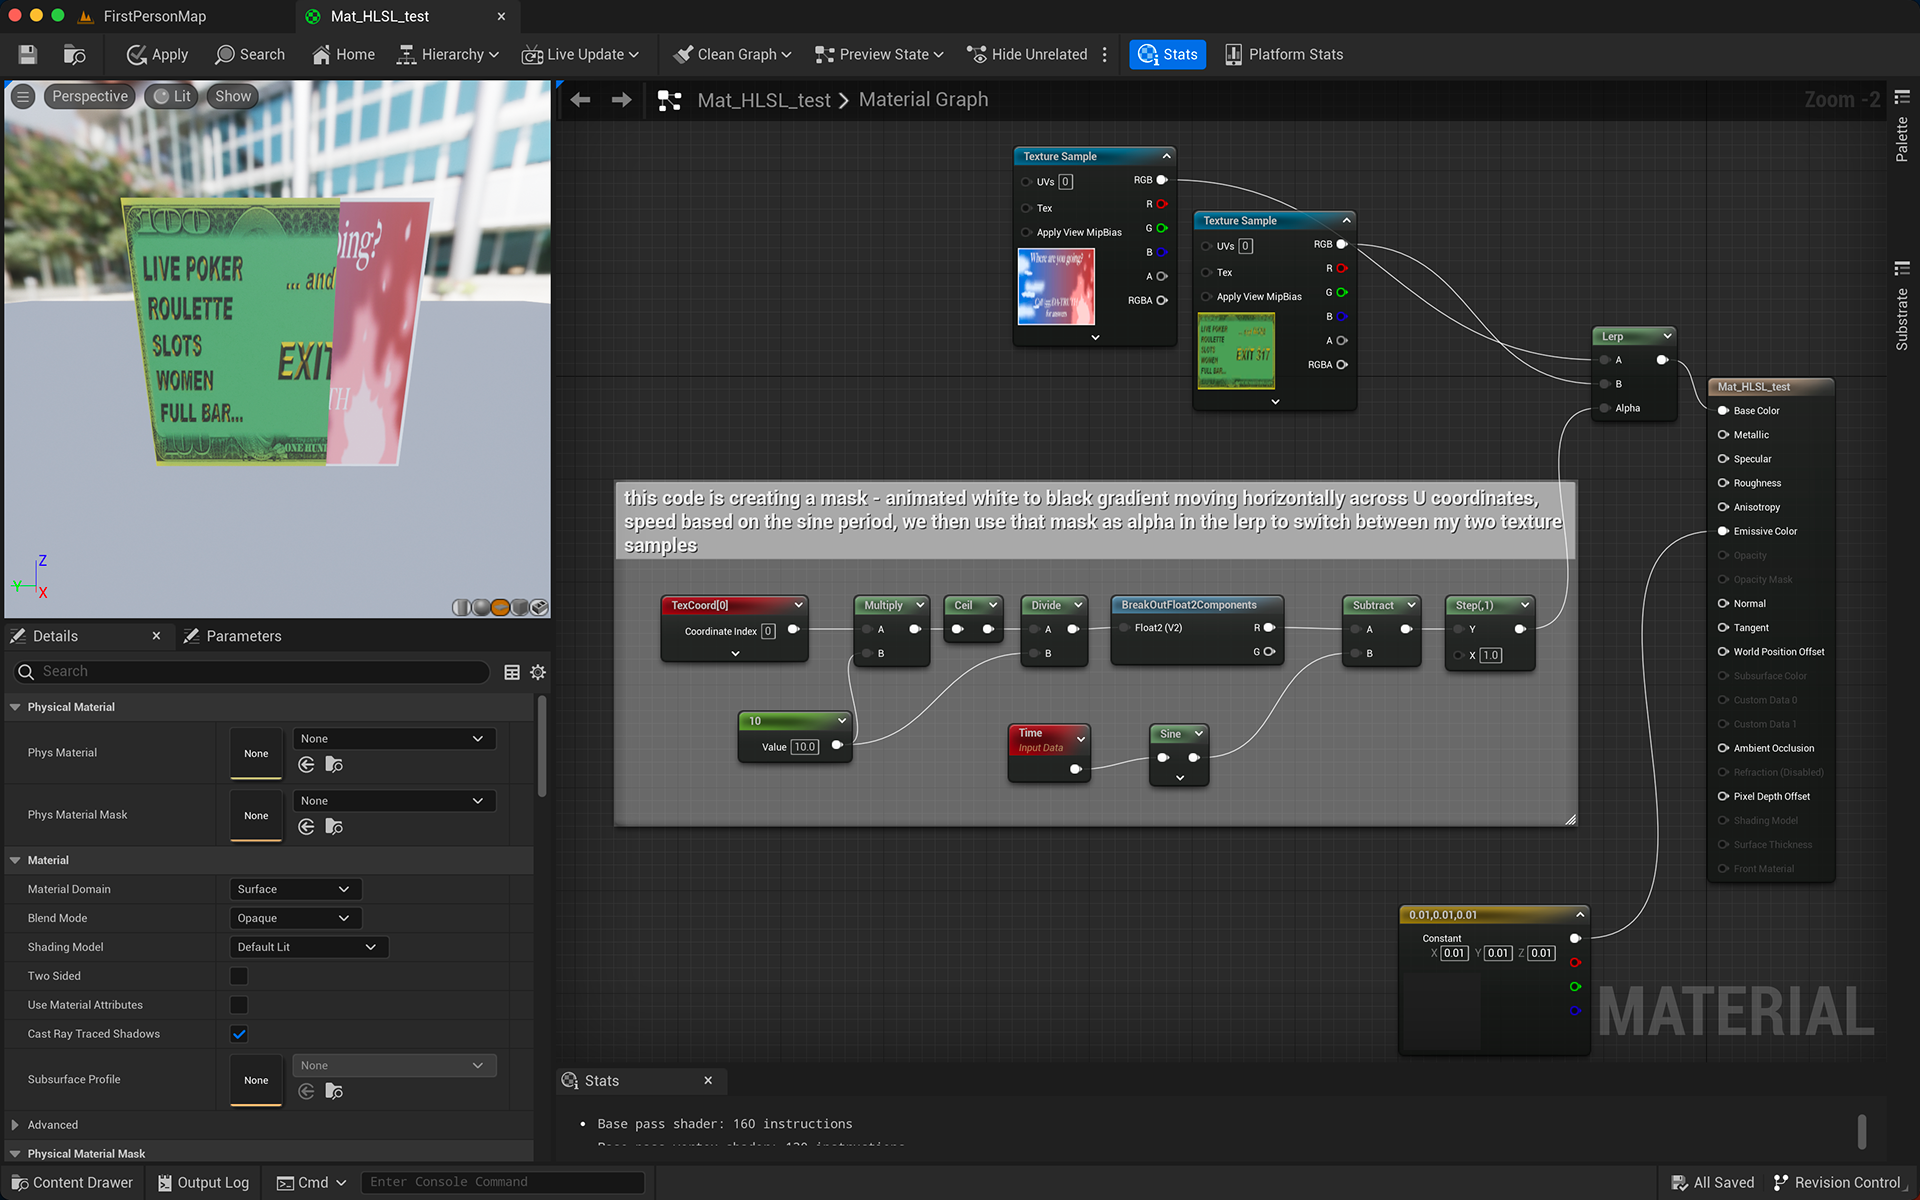
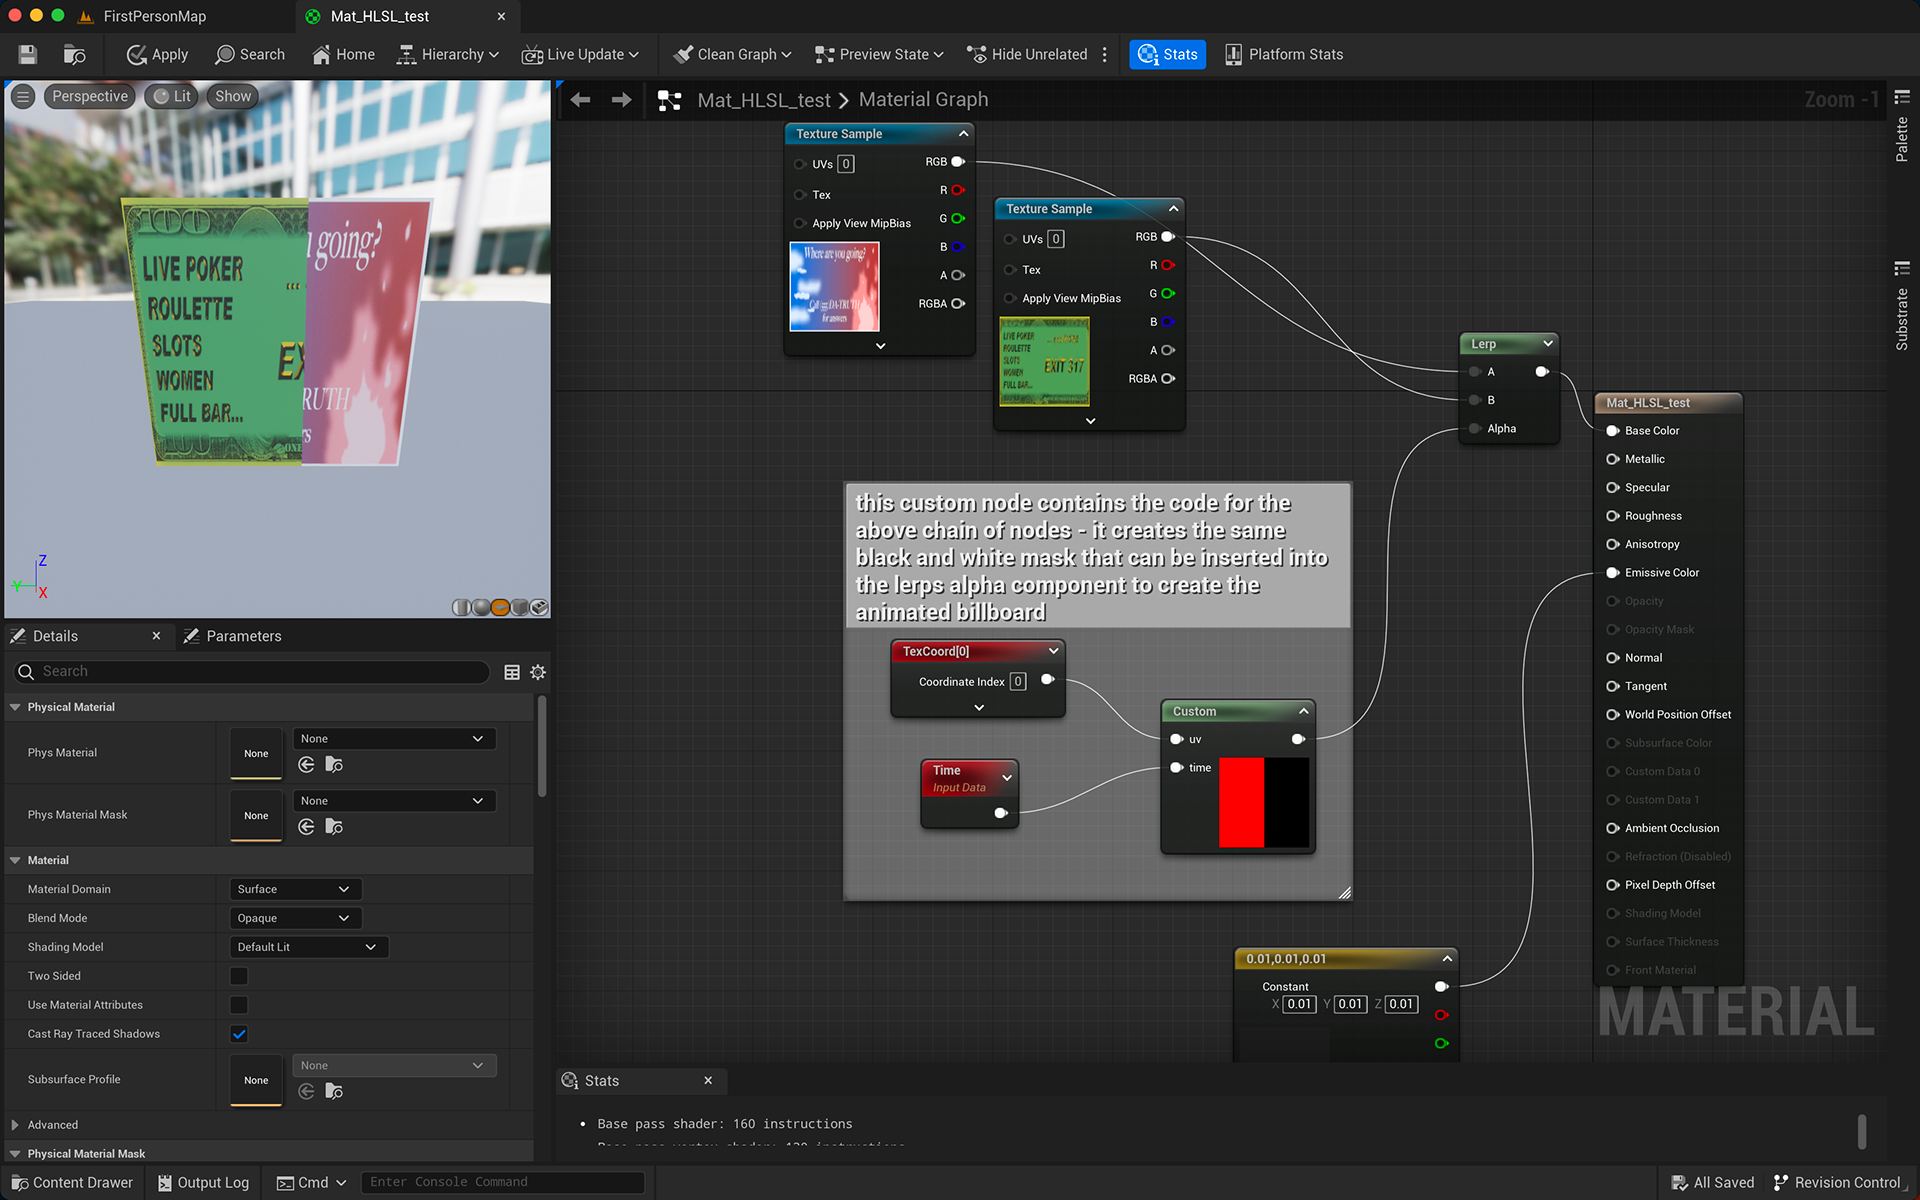
The video above shows an animated billboard switching between two advertisements in UE5. The images to the right show the blueprints to create the animated shader - either by nodes or by a custom HLSL node.

The images above show a two color toon shader made in HLSL used in Unity. View the HLSL code on my github here: https://github.com/marymonty/sample_code/blob/master/shaders/MaryToonShader.hlsl
Video Game Asset Creation
For this project, I created my assets to be fun and quirky, clearly depicting the physical objects they represent, but also including more jagged, unrealistic edges and details. Designed and built assets in Maya for my thesis project. Took those assets into Houdini or ZBrush depending on level of detail needed. Kept optimization and low poly needs in mind when creating these assets. Also UV unwrapped and textured all objects. Here is a kitchen scene modeled in Maya, detailed in Houdini, UV unwrapped in Maya, textured in Photoshop, and brought back into Maya to be lit and rendered out in Renderman.
Past Video Games
I have had the pleasure of participating in two game jams. The experience of creating a working game in 48 hours is stressful, but the results are beyond satisfying. 
The first jam, I collaborated with two best friends to create a magical rhythm game called Jason and the Giant Beats. I made all the art assets for the game, which can be seen and played here: https://simonlhopkins.itch.io/jason-and-the-giant-beats
The second jam I flew solo and was able to create a whole game in unity, with newly made models and textures, in just under 48 hours. This game, Rat World, can be seen and played here: https://marymont.itch.io/rat-world
Back to Top