PyQT and PySide for Maya
Here is a small demo showing my knowledge of PyQT / PySide widgets, signals, slots, events, and layouts and the connection of the UI to Maya functionality. I have written python code in Visual Studio Code using PyQT and PySide, then imported and loaded that python script into Maya for using the UI within Maya. This simple demo just shows a small UI with an intuitive layout that gives the user the ability to create some dynamic shapes in Maya.
Below is a snippet from my mayaMaryUI shape building code, this shows some of the initialization of the UI custom class and functions :
# python dictionary of colors:
# color name : rgb value
colorsDict = {
"grey": (0.5, 0.5, 0.5),
"red": (1,0,0),
"yellow": (1, 1, 0),
"green": (0,1,0),
"blue": (0,0,1)
}
# mayaMaryUI
# custom subclass extends QWidget
# creates my custom UI widget (our main window)
class mayaMaryUI(QtWidgets.QWidget):
# Create a default tool window.
window = None
# __init__
# extend the subclass to add content to the window using init
# passes args to the init of the super parent class
def __init__(self, parent = None):
# initialize class
super(mayaMaryUI, self).__init__(parent = parent)
# set standard flags
self.setWindowFlags(QtCore.Qt.Window)
# make the widget as QMainWindow to create our window
self.widget = QtWidgets.QMainWindow()
# set parent adds our widget to the window
self.widget.setParent(self)
# set initial window size
width = 500
height = 300
self.resize(width, height)
self.setMinimumSize(width, height)
# make UI layouts to add buttons to
# QHBoxLayout creates a horizontal layout, QVBoxLayout creates vertical
layoutHorizontalRadioButtons = QtWidgets.QHBoxLayout()
layoutHorizontalNameInput = QtWidgets.QHBoxLayout()
layout = QtWidgets.QVBoxLayout()
# create UI elements using PyQT widgets
self.btn_close = QtWidgets.QPushButton("close")
self.label_shapes = QtWidgets.QLabel("Make a ... ")
self.btn_makeSphere = QtWidgets.QRadioButton("Sphere")
# connect signals to slots
# the signals are the triggered events (like clicked, or textChanged)
# the slots are my custom functions that are called (like self.makeSphere, or self.changeColor)
self.btn_close.clicked.connect(self.close)
self.btn_makeSphere.clicked.connect(self.makeSphere)
self.btn_makeCube.clicked.connect(self.makeCube)
self.btn_makeTorus.clicked.connect(self.makeTorus)
...
...
# changeColor
...
# add values to the combo box from our colorsDict
for colorName in colorsDict:
self.comboBox_colors.addItem(colorName)
self.comboBox_colors.currentIndexChanged.connect(self.changeColor)
self.lineEdit_name.textChanged.connect(self.changeName)
self.btn_deleteShape.clicked.connect(self.deleteShape)
# add UI elements to their respective layouts
layout.addWidget(self.label_shapes)
# add radio shape buttons to their own horiztonal layout
layoutHorizontalRadioButtons.addWidget(self.btn_makeSphere)
layoutHorizontalRadioButtons.addWidget(self.btn_makeCube)
layoutHorizontalRadioButtons.addWidget(self.btn_makeTorus)
# add radio button layout to main layout
layout.addLayout( layoutHorizontalRadioButtons )
# changeColor
# deletes the selected shape
# params:
# self: the app window
# returns:
# none
def changeColor(self):
print("changing shape color")
myColor = self.comboBox_colors.currentText()
selectedObj = cmds.ls(sl=True, long=True)
# selectedObj contains a list of all selected objects (which should only ever
# contain one object in our case) but we just look at the first object in this
# list. I am slicing the string in conjunction with the indexing because
# the selected object name begins with a "|" char so I want to get rid of that
cmds.select(selectedObj[0][1:])
# set attribute using the key value pairs, breaking up the values to fit the setAttr double3 format
cmds.setAttr("lambert1.color", colorsDict[myColor][0], colorsDict[myColor][1], colorsDict[myColor][2], type = "double3")
# changeName
# changes the name of the selected shape
# params:
# self: the app window
# returns:
# none
def changeName(self):
print("changing shape name")
newName = self.lineEdit_name.text()
selectedObj = cmds.ls(sl=True, long=True)
selectedObj = selectedObj[0][1:]
cmds.rename(selectedObj, newName)
View the full shape creator code (mayaMaryUI) and all other scripts on my github: https://github.com/marymonty/sample_code/blob/master/PyQT/mayaMaryUI.py
Bedroom Builder
Created a bedroom building script in MEL for Maya. My thesis project includes creating four bedrooms, and rather than taking the time to design unique layouts and objects for each room, which is not important to the project goals, I decided to create a few versatile bedroom objects (beds, dressers, tables, chairs, and a few decorations) and have a script randomly populate, layout, and color the room for me. I designed four separate bedroom themes - children's colorful, teen blue/greens, teen pink/oranges, and adult earthy. The user can select one of those themes along with the size of the bedroom and how messy the bedroom is. The user can also press a button to create a dome light and a slider that is a simple control rig that can change the dome light - simulating changing time of day.
Below is a video demonstrating the user interface and bedroom creation:
Below is a snippet from my bedroom builder code, these are two of the necessary procedures:
// placeWallDecor
// this function places the wall decor onto the wall
// in the correct location and orientation
proc placeWallDecor(string $wallDecor1, string $wallDecor2, string $wallDecor3, int $roomSize)
{
print("wallDecor1: " + $wallDecor1 + ", wallDecor2: " + $wallDecor2 + ", wallDecor3: " + $wallDecor3 + "\n\n");
// place wallDecor1 against middleWall
// get the bounding boxes for the wall
float $middleWallPos[] = `xform -q -bb middleWall`;
select -cl;
select $wallDecor1;
xform -ro 0 0 0;
xform -translation 0 0 $middleWallPos[5];
select -cl;
// place wallDecor2 against leftWall
if ($wallDecor2 != "")
{
float $leftWallPos[] = `xform -q -bb leftWall`;
select -cl;
select $wallDecor2;
xform -ro 0 -90 0;
xform -translation $leftWallPos[3] 0 0;
select -cl;
}
// place wallDecor3 against rightWall
if ($wallDecor3 != "")
{
float $rightWallPos[] = `xform -q -bb rightWall`;
select -cl;
select $wallDecor3;
xform -ro 0 90 0;
xform -translation $rightWallPos[0] 0 0;
select -cl;
}
}
// resetScene
// hide all visible objects in the scene and reset material colors
// to clean the slate
proc resetScene()
{
print (" resetting the scene\n");
// clear the selection
select -cl;
// select all visible objects in the scene
select -all -vis;
// from the selection of all visible objects,
// I am making a list of only the selected dag objects
// and storing those in an array
string $objArr[] = `ls -dag -sl`;
// now I am going through the array of dag objects
// and hiding each object one by one
for ($obj in $objArr)
{
hide $obj;
}
// going through the materials array and reseting all to white
global string $materials[];
for ($mat in $materials)
{
setAttr ($mat + ".color") -type double3 1.0 1.0 1.0;
}
}
View the full bedroom builder code and all other scripts on my github: https://github.com/marymonty/sample_code/blob/master/maya_scripting/bedroom_builder.mel
Debris Field
Created a small scale debris field in MEL for Maya. The UI allows the user to choose which types of debris they want to populate the scene with, how big the ground plane should be, and how many spots in the scene that should not have debris. After this, the user is prompted with an additional UI that has them select ratios of debris, and determine points and radii of where the debris should not be. This was a basic proof of concept scene that could be built upon with additional debris pieces and added collision detection between debris pieces themselves if needed.
Below is a video demonstrating the user experience:
Here is a snippet of my debris field code, this is the function for creating rocks:
// createRocks
// creates the debris field of rocks
// params:
// $numDebrisPieces : the number of pieces of debris (found with getDebrisPieces and ratio)
// $x : the length of the x plane
// $z : the length of the z plane
// $xyzRadStrArr : the string array of the x,y,z and pos of where the user does not want debris
proc int createRocks(int $numDebrisPieces, float $x, float $z, string $xyzRadStrArr[])
{
// create a group for the rocks
group -em -name rockGroup;
// loop through the number of pieces of debris that need to be created
int $piece;
for ($piece = 0; $piece < $numDebrisPieces; $piece++)
{
// figure out where to place the rock using rand on the x, z ground plane
// while loop to check if the position is valid (not within the radius
// of a point to not put debirs in)
int $posIsValid = true;
int $keepGoing = true;
float $xPos;
float $zPos;
while ($keepGoing == true)
{
// create the randomized x, z point
$xPos = rand(0.0 - ($x/2.0), 0.0 + ($x/2.0));
$zPos = rand(0.0 - ($z/2.0), 0.0 + ($z/2.0));
// loop through the invalid points
int $invalidPtsSize = `size $xyzRadStrArr`;
int $i;
for ($i = 0; $i < $invalidPtsSize; $i++)
{
// get the invalid point
float $noXPos = `floatFieldGrp -q -value1 $xyzRadStrArr[$i]`;
float $noZPos = `floatFieldGrp -q -value3 $xyzRadStrArr[$i]`;
float $noRadius = `floatFieldGrp -q -value4 $xyzRadStrArr[$i]`;
// check if our x,z point is within the radius of the user no-go point
if ($xPos > ($noXPos - ($noRadius/2)) && $xPos < ($noXPos + ($noRadius/2)))
{
if ($zPos > ($noZPos - ($noRadius/2)) && $zPos < ($noZPos + ($noRadius/2)))
{
// our point is within a no-debris zone, so our position point is not valid
$posIsValid = false;
$i = $invalidPtsSize;
}
else
{
// our point is valid
$posIsValid = true;
}
}
else
{
// our point is valid
$posIsValid = true;
}
}
if ($posIsValid == true)
{
// our point is vaid so we can break and exit the loop
$keepGoing = false;
break;
}
// else we want to rerun the loop to generate new rand x and z positions
}
// when we exit the loop we should have a valid x and z position
// now create a randomized scale for the object
float $scale = 0.25;
float $initialRand = rand(0, 1);
// making it more likely that a small object get created than a larger one
if ($initialRand < 0.75)
{
$scale = rand(0.01, 0.5);
}
else if ($initialRand < 0.95)
{
$scale = rand(0.5, 1);
}
else
{
$scale = rand(1, 2);
}
// randomize a rotate value
float $rotate = rand(0, 360);
// finally create the rock
// select our rock
select -cl;
select -r rock;
// create an instance of the rock
string $currRockArr[] = `instance`;
// scale the rock to our scale values
scale -r $scale $scale $scale;
// rotate the rock to our rotate value
rotate -r 0 $rotate 0;
// translate based on world space
// the Y value should be the $scale for the rock to be flush with the ground
xform -translation $xPos $scale $zPos;
parent $currRockArr[0] rockGroup;
}
// hide the initial rock when done
hide rock;
return 1;
}
View the full debris field code and all other scripts on my github: https://github.com/marymonty/sample_code/blob/master/maya_scripting/debris_field.mel
Quick Crowd Creator
Created a "Quick Crowd Creator" in Python for Maya. This script offers the user three ways to quickly create a crowd - by number of crowd members, by single body makeup, or the combination of custom body makeup and amount of times that body gets created. This was a basic proof of concept scene that could be built upon with uniquely modeled hair styles, face shapes, clothing, accessories, etc. View a video of the script in action:
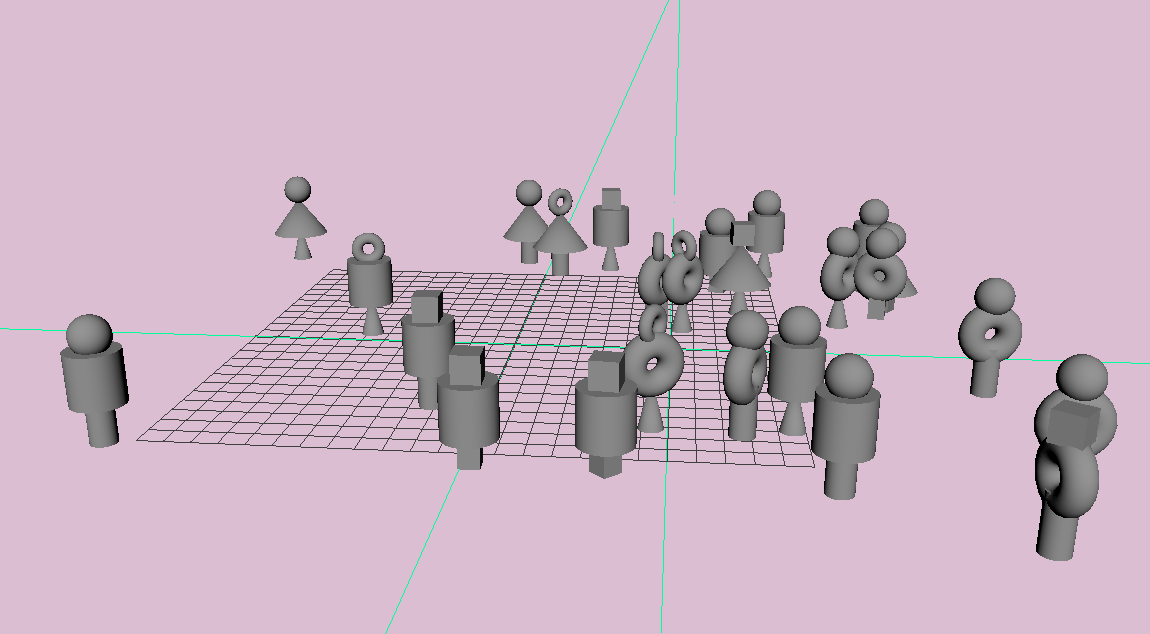
A snippet of Script 3 - crowdByBodyTypeAndNumber - is copied below:
#createUI
#createCrowd
# takes in the number of crowd members to create as input
# and creates that many number of randomized crowd members
def createCrowd( pHeadType, pBodyType, pLegType, pNumMember ):
# randomize using new seeds
seed = random.uniform( 0, 100 )
random.seed( seed )
#create a var for the number of body parts
numBodyParts = 3
############## HEADS ################
#create a sphere, torus, and cube for different head shapes
sphereHead = cmds.polySphere( r=0.75, name="sphereHead#" )
torusHead = cmds.polyTorus( r=0.5, sr=0.25, name="torusHead#" )
cubeHead = cmds.polyCube( sx=5, sy=5, sz=5, name="cubeHead#" )
#we want the original torus to be rotated 90 degrees on the x axis
cmds.rotate( 90, 0, 0, torusHead )
#create the heads array
headsArr = [ sphereHead, torusHead, cubeHead ]
############## BODIES ################
#create a sphere, torus, and cube for different head shapes
prismBody = cmds.polyPrism( ns=3, w=3, name="prismBody#" )
torusBody = cmds.polyTorus( r=0.75, sr=0.5, name="torusBody#" )
diceBody = cmds.polyPlatonicSolid( r=0.75, l=0.9, name="diceBody#" )
#we want the original torus to be rotated 90 degrees on the x axis
cmds.rotate( 90, 0, 0, torusBody )
#create the body array
bodyArr = [ prismBody, torusBody, diceBody ]
############## FEET ################
#create a sphere, torus, and cube for different head shapes
cubeFeet = cmds.polyCube( d=0.75, h=1.0, w=0.75, name="cubeFeet#" )
coneFeet = cmds.polyCone( r=0.5, name="coneFeet#" )
cylFeet = cmds.polyCylinder( r=0.5, name="cylFeet#" )
#create the feet array
feetArr = [ cubeFeet, coneFeet, cylFeet ]
#group by body
bodyGroup = cmds.group( empty=True, name="body_group#"
# takes the name of the window, and a callback function as params
# creates the UI window for user input
def createUI( pWindowTitle, pApplyCallback ):
# we can uniquely identify each window to make sure only one instance is open at any given time
# so create and identify our window, then check if it already exists
windowID = "myWindowID"
if cmds.window( windowID, exists=True ):
#it does already exist, so delete it
cmds.deleteUI( windowID )
#create the window
cmds.window( windowID, title=pWindowTitle, sizeable=False, resizeToFitChildren=True )
# create a rowColumnLayout to determnine elements in UI layout
cmds.rowColumnLayout( numberOfColumns=2, columnWidth=[ (1, 500), (2, 60) ], columnOffset=[ (1, "left", 5) ] )
#using layout, add text, input fields, button, etc
headType = cmds.radioButtonGrp( numberOfRadioButtons=3, label="Head Types:", labelArray3=["Sphere", "Torus", "Cube"])
cmds.separator( h=20 )
bodyType = cmds.radioButtonGrp( numberOfRadioButtons=3, label="Body Types:", labelArray3=["Prism", "Torus", "Icosahedron"])
cmds.separator( h=20 )
legType = cmds.radioButtonGrp( numberOfRadioButtons=3, label="Leg Types:", labelArray3=["Cube", "Cone", "Cylinder"])
cmds.separator( h=20 )
cmds.text( label="Number of this crowd member type:" )
numMember = cmds.intField( value=1 )
# our final row has our buttons in the 0th and 1st cols
# when the button is pressed, we use the functools partial function
# which wraps the callback function along with its arguments
# but delays its execution until the apply button is pressed
cmds.button( label="Apply", command=functools.partial( pApplyCallback,
headType, bodyType, legType,
numMember ) )
#create a cancelCallback function which takes unspecified number of args, denoted by *
def cancelCallback( *pArgs):
if cmds.window( windowID, exists=True ):
cmds.deleteUI( windowID )
cmds.button( label="Cancel", command=cancelCallback )
#display the window with showWindow function
cmds.showWindow()
#createCrowd
# takes in the number of crowd members to create as input
# and creates that many number of randomized crowd members
def createCrowd( pHeadType, pBodyType, pLegType, pNumMember ):
# randomize using new seeds
seed = random.uniform( 0, 100 )
random.seed( seed )
#create a var for the number of body parts
numBodyParts = 3
############## HEADS ################
#create a sphere, torus, and cube for different head shapes
sphereHead = cmds.polySphere( r=0.75, name="sphereHead#" )
torusHead = cmds.polyTorus( r=0.5, sr=0.25, name="torusHead#" )
cubeHead = cmds.polyCube( sx=5, sy=5, sz=5, name="cubeHead#" )
#we want the original torus to be rotated 90 degrees on the x axis
cmds.rotate( 90, 0, 0, torusHead )
#create the heads array
headsArr = [ sphereHead, torusHead, cubeHead ]
############## BODIES ################
#create a sphere, torus, and cube for different head shapes
prismBody = cmds.polyPrism( ns=3, w=3, name="prismBody#" )
torusBody = cmds.polyTorus( r=0.75, sr=0.5, name="torusBody#" )
diceBody = cmds.polyPlatonicSolid( r=0.75, l=0.9, name="diceBody#" )
#we want the original torus to be rotated 90 degrees on the x axis
cmds.rotate( 90, 0, 0, torusBody )
#create the body array
bodyArr = [ prismBody, torusBody, diceBody ]
############## FEET ################
#create a sphere, torus, and cube for different head shapes
cubeFeet = cmds.polyCube( d=0.75, h=1.0, w=0.75, name="cubeFeet#" )
coneFeet = cmds.polyCone( r=0.5, name="coneFeet#" )
cylFeet = cmds.polyCylinder( r=0.5, name="cylFeet#" )
#create the feet array
feetArr = [ cubeFeet, coneFeet, cylFeet ]
#group by body
bodyGroup = cmds.group( empty=True, name="body_group#"
View the full quick crowd creation code and all other scripts on my github: https://github.com/marymonty/sample_code/tree/master/maya_scripting
Facial Emotion Control Rig
Created a simple facial emotion control rig in MEL for Maya. I modeled a simple face with eyebrows, eyes, and lips that are controllable through a 'slider' node. This slider is a simple circle who is parented to a space locator node so we can keep track of the circles movement. Since it is a simple slider, we limit the slider movement to the Y axis only. When moving the slider in the positive Y direction, the facial features get 'happier' - the eyebrows rotate upwards, the eyes enlarge, and the corners of the mouth move up to form a smile. When moving the slider in the negative Y direction, the facial features get 'angrier' - the eyebrows rotate downwards, the eyes shrink closed before enlarging again, and the corners of the mouth move down to form a frown. Because visually rotation moves at a much slower increment than translation and scale, I also used a MultiplyDivide node to control the eye scaling and mouth translation in relation (a 16th of the amount) to the eyebrow rotation. View a video demo of the code below, followed by the script itself.
// Mary Montgomery
// Montgomery_Assignment02.mel
// Montgomery_Assignment02.mel
// with the slider I will control:
// the eyeball scale - up = large, down = small
// the eyebrow rotation - up = pointed up (backslash) happy, down = pointed down (forward slash) angry
// the tranlation of corner of mouth vertices, up = smile, down = frown
// the eyeball scale - up = large, down = small
// the eyebrow rotation - up = pointed up (backslash) happy, down = pointed down (forward slash) angry
// the tranlation of corner of mouth vertices, up = smile, down = frown
// setup creating the slider and sliderLocator
// create a locator
spaceLocator -n "sliderLocator";
// create a nurbs circle
circle -n "slider";
// parent the circle to the spaceLocator (locator is parent)
// we parent so we can move the slider locator wherever is convenient
parent slider sliderLocator;
// make the slider visible
setAttr "sliderLocator.translateZ" 10;
setAttr "sliderLocator.rotateY" 90;
// we only want to manipulate the slider on the Y axis
// because of this, we can lock the other attributes
// lock the controller
setAttr -lock true "slider.translateX";
setAttr -lock true "slider.translateZ";
setAttr -lock true "slider.translateX";
setAttr -lock true "slider.translateZ";
// connect the slider to the eyebrow X axis rotation
// to change the emotion
connectAttr "slider.translateY" "eyebrow1.rotateX";
connectAttr "slider.translateY" "eyebrow2.rotateX";
// create multiplyDivide node
createNode multiplyDivide -n "multDivNode";
// we can set the type of operation by using the operation attribute
// 1 = multiply, 2 = divide, 3 = power
setAttr "multDivNode.operation" 2;
// connect the input to the slider
// we are giving the multDivNode two inputs - the slider translate value,
// and the number to divide by in the operation
connectAttr "slider.translateY" "multDivNode.input1X";
// the scale and translate for the eyes and mouth respectively
// is much faster than the eyebrows rotate, so we need to
// even the movement with this large division
setAttr "multDivNode.input2X" 16;
// connect the multDivNode to the eyeball's X scale
// we are controlling only the X axis scale so it looks like
// the eyeball is blinking and not disappearing
connectAttr "multDivNode.outputX" "eye1.scaleX";
connectAttr "multDivNode.outputX" "eye2.scaleX";
// connect the multDivNode to the corners of the mouth (vertices) Y axis
// by using the CVs of the points
// this will control the smile / frown
connectAttr "multDivNode.outputX" "lipsShape.pnts[2].pnty";
connectAttr "multDivNode.outputX" "lipsShape.pnts[3].pnty";
connectAttr "multDivNode.outputX" "lipsShape.pnts[14].pnty";
connectAttr "multDivNode.outputX" "lipsShape.pnts[15].pnty";
View the full facial emotion control rig code and all other scripts on my github: https://github.com/marymonty/sample_code/blob/master/maya_scripting/facial_emotion_control_rig.mel
Row House Builder
Created a script to build up to ten row houses with ability to space them out in MEL for Maya. For my thesis project, the intro has the player walking through a dimly lit street that requires there to be lots of row houses - I wanted to save time and energy custom modeling these houses since they are only in frame extremely briefly and insignificantly, so I wrote this script to very quickly allow me to build many row houses that are customizable and able to be spaced out.
Below is a video showing the functionality:
Here is a snippet from the house building script:
// createSlider
// creates a slider to control the spacing between houses
proc createSlider()
{
// global for the completed houses
global string $completedHouses[];
// create and connect a space locator node to the house X movement
spaceLocator -n "sliderLocator";
// create a nurbs circle
circle -n "slider" -r 2;
// parent the circle to the spaceLocator (locator is parent)
// we parent so we can move the slider locator wherever is convenient
parent slider sliderLocator;
// make the slider visible
setAttr "sliderLocator.translateX" -7;
// we only want to manipulate the slider on the Y axis
// because of this, we can lock the other attributes
setAttr -lock true "slider.translateX";
setAttr -lock true "slider.translateZ";
// loop through the houses creating a multiple divide node for each
// to control different house movements
int $numHouses = `size $completedHouses`;
float $currMult = 0.2;
int $i;
for ($i = 0; $i < $numHouses; $i++)
{
// create a multiply divide node
createNode multiplyDivide -n ("multDivNode" + $i);
// we can set the type of operation by using the operation attribute
// 1 = multiply, 2 = divide, 3 = power
setAttr ("multDivNode" + $i + ".operation") 1;
// connect the input to the slider
// we are giving the multDivNode two inputs - the slider translate value,
// and the number to multiply by in the operation
connectAttr "slider.translateY" ("multDivNode" + $i + ".input1X");
setAttr ("multDivNode" + $i + ".input2X") $currMult;
$currMult += 0.1;
// connect the multDiv output to the houses X movement
connectAttr ("multDivNode" + $i + ".outputX") ($completedHouses[$i] + ".translateX");
}
}
View the full row house builder code and all other scripts on my github: https://github.com/marymonty/sample_code/blob/master/maya_scripting/row_house_builder.mel